1: Install the Software
First, install the software by running the MSI installation file.
2: Where to Install Software
- All users should access the software by clicking on a shortcut on their desktop that points to a UNC path on the network. Example: \\SomeServer\someShare\Lockbox\
- Only one installation should exist on the network. Multiple installations can cause problems with versioning.
- UNCs are always preferred over mapped network drives (which are often not mapped on servers).
3. Server Location
Which server should host the network share containing the software’s program files?
It does not matter unless the automated service (lights out mode) is being used. This is where Pulse eCommerce runs by itself most of the time without user intervention. If the Windows service is not going to be used, then it does not matter which server (or NAS or SAN) is used. If the service will be used, then the software should be installed on the Windows Server which will be running the Windows service. An application server is perfect for this job, but any server will do.
If there is any confusion, just pick a place to install the software. Don’t stop the project. The software is very easy to move to a different location later.
4: Create the PULSE Database
This is a very small database used to house all the fancy mapping settings. It can be called anything, but Pulse, Pulse eCommerce, Pulse Lockbox should be used. Pulse eCommerce and Lockbox can both share the same Pulse database, but it is recommended to give each software its own separate Pulse database.
Open SQL Management Studio. Right-click on databases. Click “New Database”. Call it Pulse, Pulse eCommerce, or PulseLockbox. Accept all the default parameters, or let the IT person make any changes desired.
5: Authentication
The software needs to know how to authenticate with the SQL server that hosts it’s Pulse database, and any Macola data databases it will be required to talk to. It can use Windows authentication or SQL server authentication.
If there is confusion, just use SQL authentication for now. This can be changed very easily later.
6: Create SQL Server User
- Open SQL Server Management Studio.
- Click on Security \ Logins
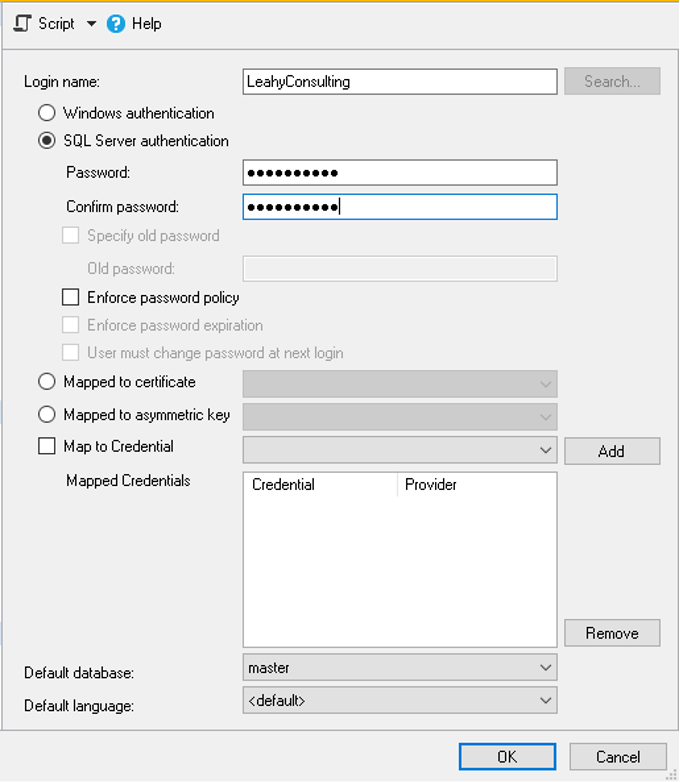
- Right-click on Logins. Click on New Login. The screen shown below will appear.

- Name the user LeahyConsulting, Pulse, or something similar. Give it a complex password. Uncheck the 3 deadly boxes: “Enforce Password Expiration policy”, “Enforce password Expiration”, and “user must change password at next login”.
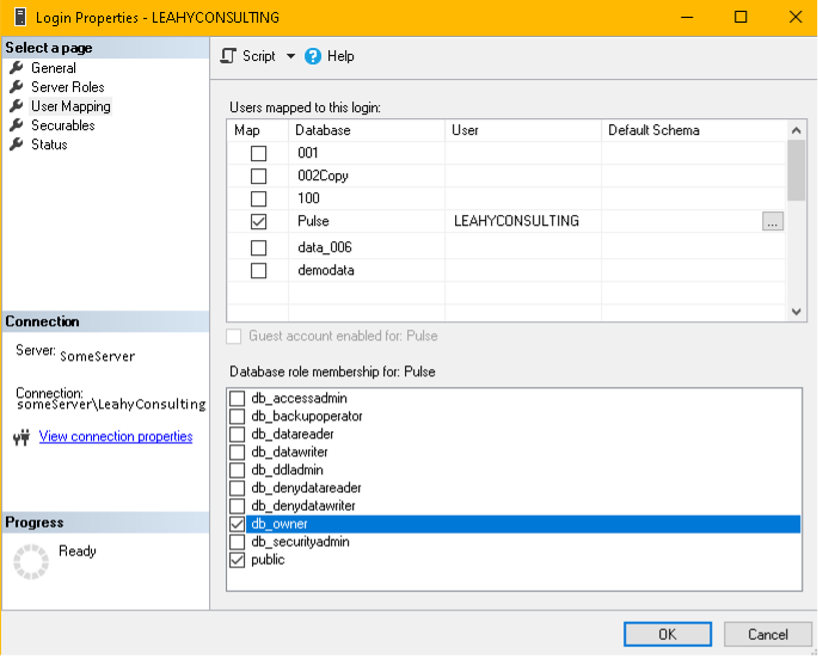
- On this same screen, click on the “User Mapping” tab. This tab is shown below.

- In the upper box titled “Users Mapped to this Login”, check each database that Pulse eCommerce or Lockbox will need to access. You must check the newly created Pulse database and at least one Macola database.
- When you click on a database in the top box, the lower box titled “Database role membership for [User]” will change. Ensure that db_owner is checked for the Pulse database, and any Macola databases required.
7: Tell Software how to Access PULSE Database
Next, you will need to tell eCommerce or Lockbox how to access its Pulse Database. To do this,
- Run the software.
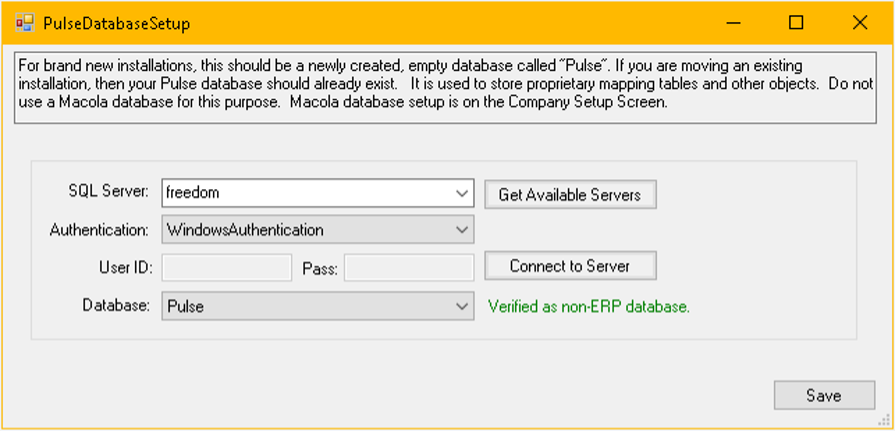
- The pulse Database connection dialog should open up by default. If not, click on Settings \ Pulse Database Setup. This screen is shown below.

- Use this screen to select the SQL server and newly created Pulse database. If SQL authentication is to be used, the username and password must be entered. Press save and close this screen.
- The software will now prompt for the License ID. Copy / paste. Click ok. Close the screen after the license is downloaded.
8: Tell Software how to Connect to Macola
Next, tell the software how to connect to Macola companies.
- After closing the License screen, the Company Database Setup screen should open. If this screen does not open automatically, click on Settings \ Company Database Setup. This screen is shown below.

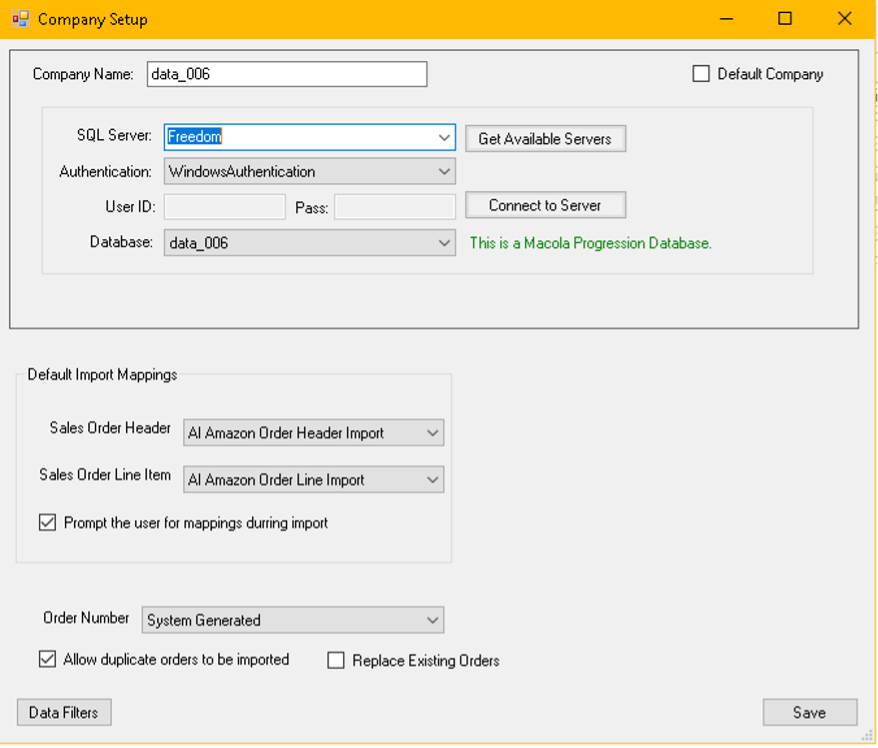
This screen will show all Macola companies setup in Lockbox / eCommerce. With a fresh installation, there will be no companies listed yet. Click on “New Company”. The create / edit company screen will popup as shown below.

- Specify the server, database, and authentication information. Give the company a recognizable name. Click save. The screen shown above is the company setup screen for Pulse eCommerce. The same screen in Lockbox looks different. All that matters at the moment is to fill out the database connectivity. Click Save and close this screen.
9: Setup Complete
Congratulations! At this point, Pulse eCommerce / Lockbox is set up. The next steps will be to import some existing schemas/mappings AND/OR create some from scratch.
