We have published checklists to streamline your operations for the past thirty-five years. Carefully read this document before proceeding, and contact us, if needed, to assist in planning or conducting your physical inventory. You can also refer to the online help and the Macola® website.
Overview of Macola Physical Inventory Processing Workflow
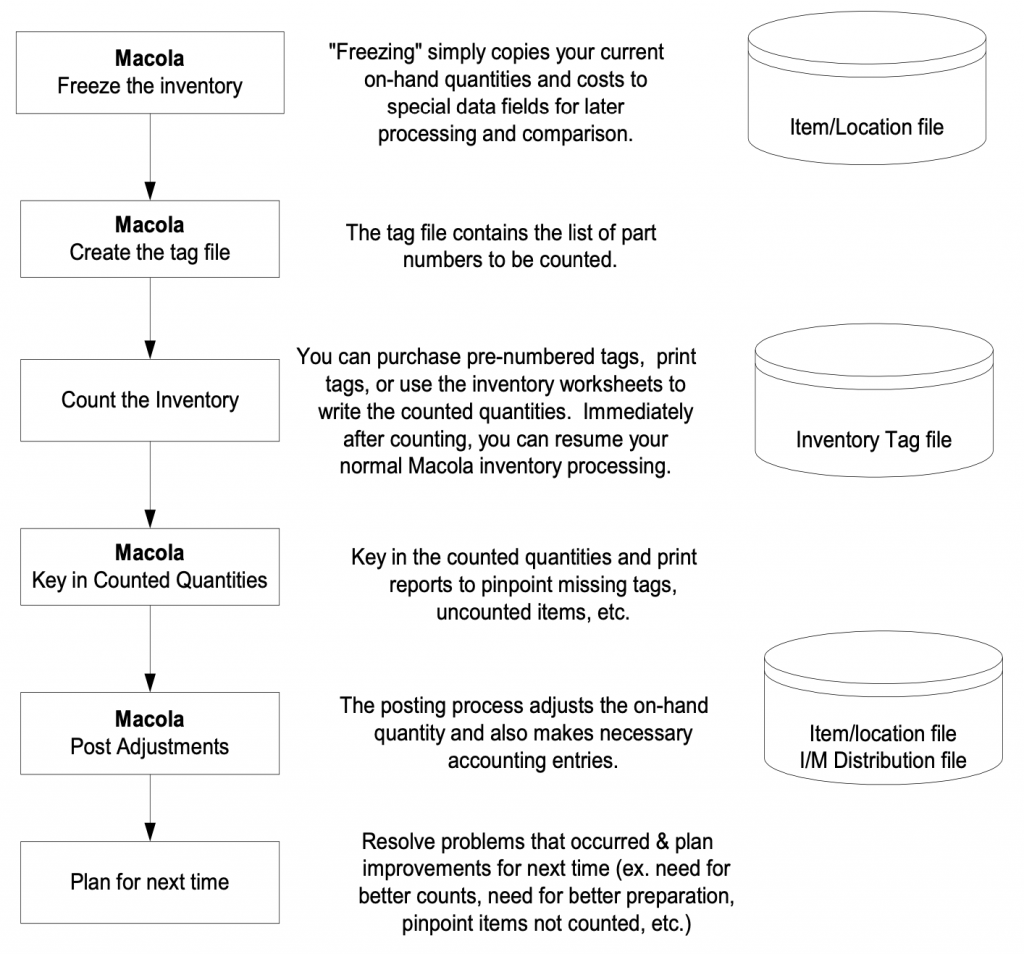
Things to consider as you prepare for counting
- Read all of the following steps before starting.
- Make a backup of your Macola data files.
- Refresh your test database to use for PRACTICE testing and posting! You need to PRACTICE.
- Do not delay your month-end and year-end processing if your physical inventory reconciliation is delayed. You can post your tags later.
- Set negative on-hand items to zero – the software will not work correctly with a negative on-hand qty.
- Assure that no items have a zero-unit cost – the software will not work correctly with zero-unit costs.
- Ensure all items are stocked, controlled, and have checked the ‘Inv Trx Audit’ box.
- Assure that all units of measure are correct.
- Use the PULSE Dashboard software to verify the above items.
Processing Steps
1. Key in and post all transactions that affect on-hand quantities
- Complete this step the day before the physical inventory.
- All personnel should STOP keying in P/O receipts, inventory transactions, and production orders. This includes posting customer invoices.
- Processing can be resumed after step 6 below.
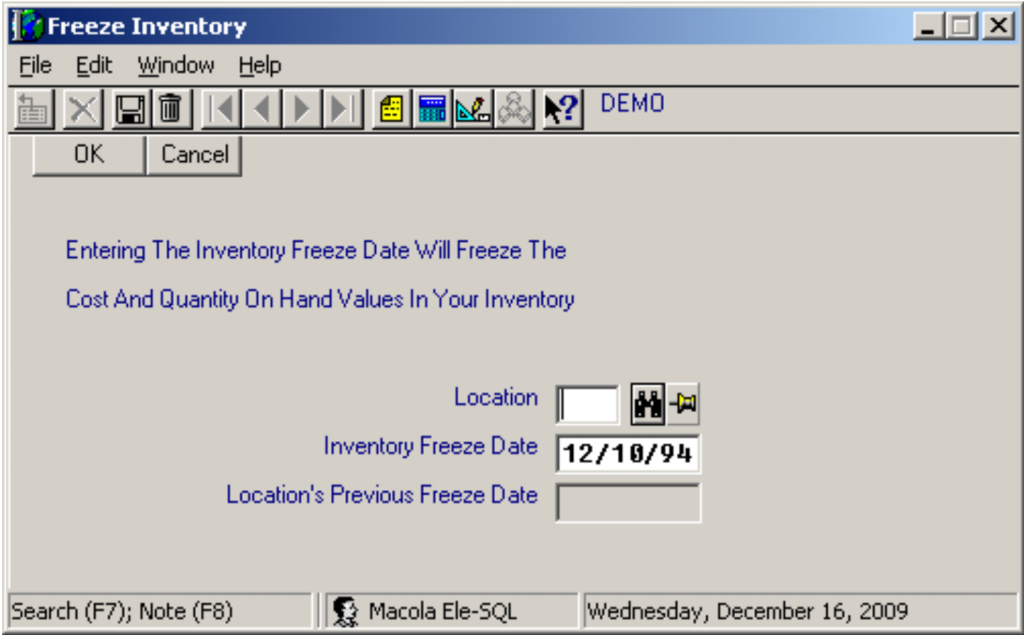
2. Run the Freeze Inventory program
- Complete this step the day before the physical inventory.
- Key in the location and date you will be counting your inventory.
- This program stores current on-hand quantities and costs in the item/location file. You can view this data in the item/location file screens.
- You cannot backdate the freeze date.
The following is a sample of this screen:
- Complete this step the day before the physical inventory.
- Print/spool to disk this report for future reference and write down the total on the last page of the report.
- This program will optionally print your inventory tags.
- THIS STEP MUST BE RUN IMMEDIATELY AFTER FREEZING YOUR INVENTORY IN STEP 2 ABOVE.
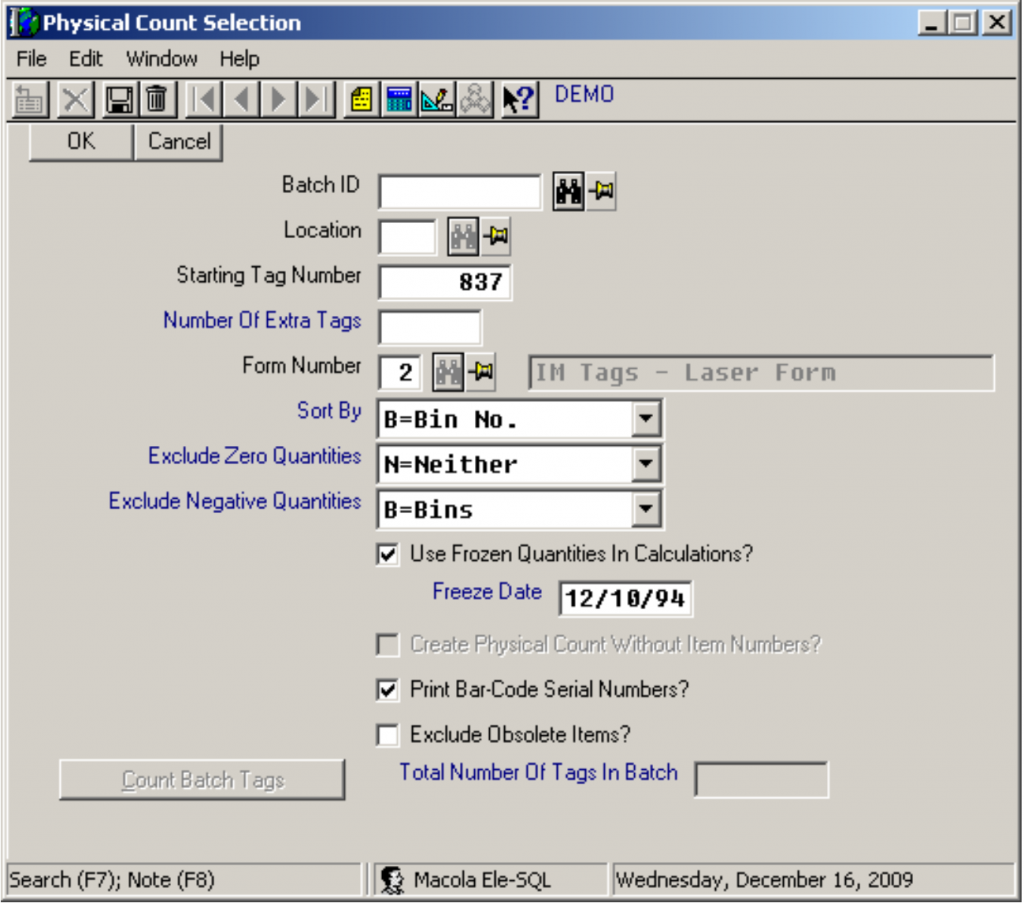
- Please carefully read the following as the options dictate how subsequent processing steps will be performed:
- Batch ID – Use the name of your inventory location.
- Location – This is the inventory location.
- Starting Tag Number – It is important to remember that the Macola® inventory transaction file retains the tags numbers that were previously used. DO NOT order pre-printed tags each year with the same starting tag number.
- Number of Extra Tags – You may need extra tags to count items stored in multiple places. Remember that you must account for all tags, even if you do not use all of them. Note: if you do not create enough extra tags, you will not be able to create any more until you key in and post all your tag counts.
- Form Number – This is your default tag form number
- Sort by – It is essential to plan in advance what sorting sequence you want for your tags or worksheets. The software offers a variety of options for sorting.
- Exclude Zero On-Hand Quantities? Select N (Neither). DO NOT exclude zero on-hand quantity items.
- Exclude Negative Quantities? – DO NOT exclude negative quantities. Select N (Neither). Before running this program, be sure that you have eliminated all negative on-hand quantities.
- Use Frozen Quantities in Calculation? YOU MUST ACTIVATE THIS BOX, or the posting program will not calculate variance dollar entries.
- Freeze Date – Enter the date of youe physical inventory (ex 12/31/19). Write down this date for later reference.
- Create Physical Count Withour Item Numbers? This option is only available for non-bin inventory locations. The answer to this question tells the software if you want to print the item number on each tag. THIS QUESTION IS CONFUSING! BE SURE YOU UNDERSTAND IT BEFORE PROCEEDING! If you DO check this box, the software will create a tag number in the tag file, but NO part number will be associated with each tag. This will create more work counting since you must write down the part number on each tag. The benefit of this option is that you have more flexibility when distributing tags to the counting personnel. It also creates more work when entering tags, since the part number will have to be keyed. If you DO NOT check this box, the software will assign a part number to each tag number in the tag file. The disadvantage of this option is that you may have to sort the tags before distributing them to the counting personnel. The benefit is that you do not have to key in the part number when keying in the tag counts.
- Exclude Obsolete Items? This box MUST be checked. You do not want to count obsolete items.
- Count Batch Tags Press this button to obtain a count of the number of tags that will be needed (items to be counted plus extra tags). Print a screenshot of your settings before clicking the ‘OK’ button.
- You have two choices. You can manually write down the counted quantities, OR you can use the Wisys software to scan each item’s quantity.
- In Step 4 above, the program expects you to print physical inventory tags or a count sheet. You can use Macola’s pre-printed tags or use plain paper. Some people prefer a two-part tag with one part being left with the items being counted.
- Another alternative is to print Count Worksheets. These are not as flexible as individual tags, but they are efficient if a smaller number of items is to be counted.
- You should now count your inventory. This includes your re-counts.
- An explanation of how the software works (if you are using the frozen quantities) might be useful:
- Let’s say the software shows an on-hand quantity of 100 on the frozen stock status report, but you count only 95.
- This means that the software must adjust a quantity of 5 for the shortage (i.e., the difference between the frozen and counted quantities).
- All personnel can now resume processing P/O receipts, inventory issues, production reporting, customer invoicing, etc., as normal.
- Remember, the posting program (step 12) will make an adjustment based on the difference between the frozen quantity and the counted quantity (if you are using the frozen quantities).
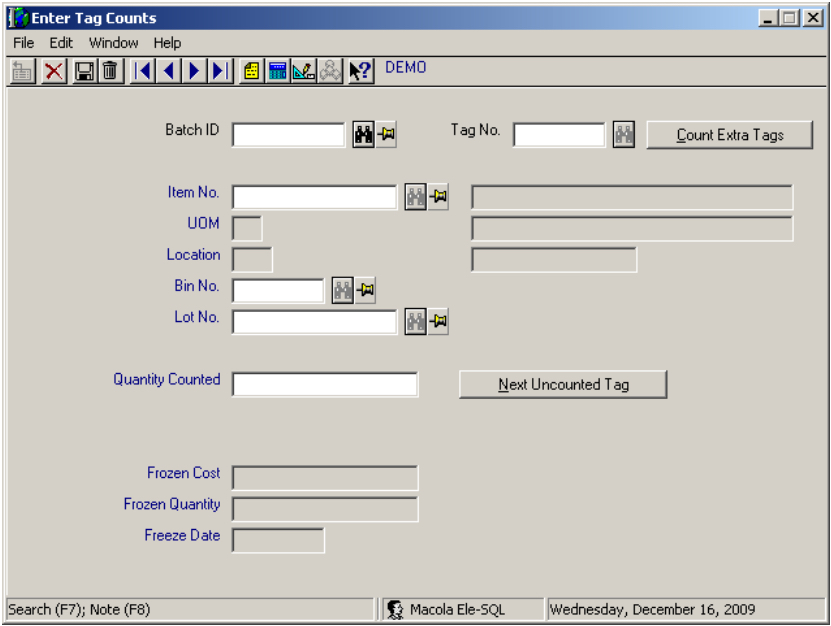
- If you activated the check box to “Create Physical Count Without Item Numbers?” in Step 5 above, you will need to key in or scan both the item number and counted quantity. If not, you only need to key in the counted quantity. The frozen quantity is displayed for reference purposes.
- After you have keyed in all of your tags, print the Uncounted Inventory and the Counts by Tag reports.
- The following Macola® reports can assist you in reconciling your inventory counts.
- Count by Tags or by Item Report
- Missing Tag Report (the extra tags should be the only ones that appear on the report)
- Uncounted Inventory
- Extra Tags Report
- Variance by Tag or by Item Report
- Identify potential problem items that may require re-counting. Based on the above reports, make any corrections necessary.
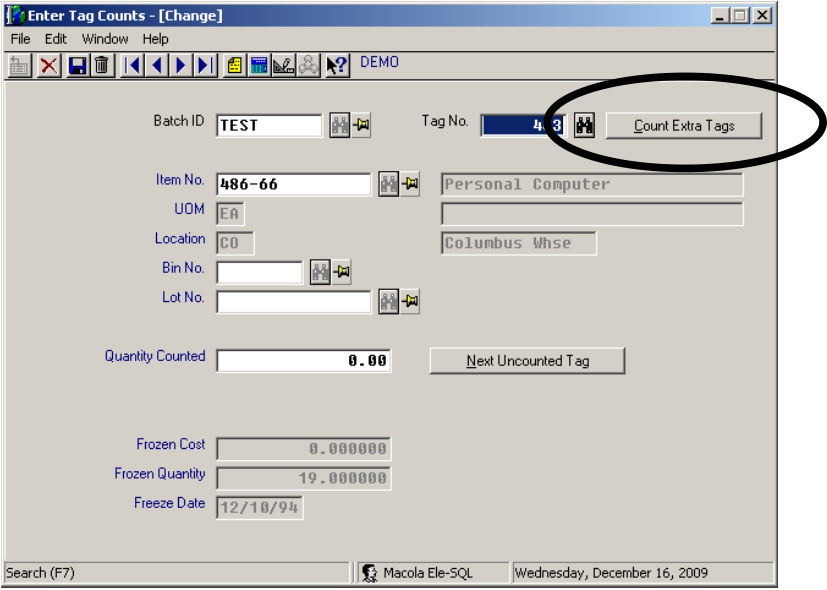
- Press the “Count Extra Tags” button.
- After counting and reconciling your inventory, you MUST press the “Count Extra Tags” button to insert a zero quantity for tags you did not count or unused extra tags numbers you did not use. Until you perform this step, you will not be able to post your tags.
10. Print the Frozen Stock Status report again
- Compare the total to the total from step 4 above (it should be the same). If a variance exists, an unauthorized transaction was keyed in using a date equal to or earlier than the freeze date. This will need to be investigated.
11. Print the Inventory Pre-Posting Tag Register
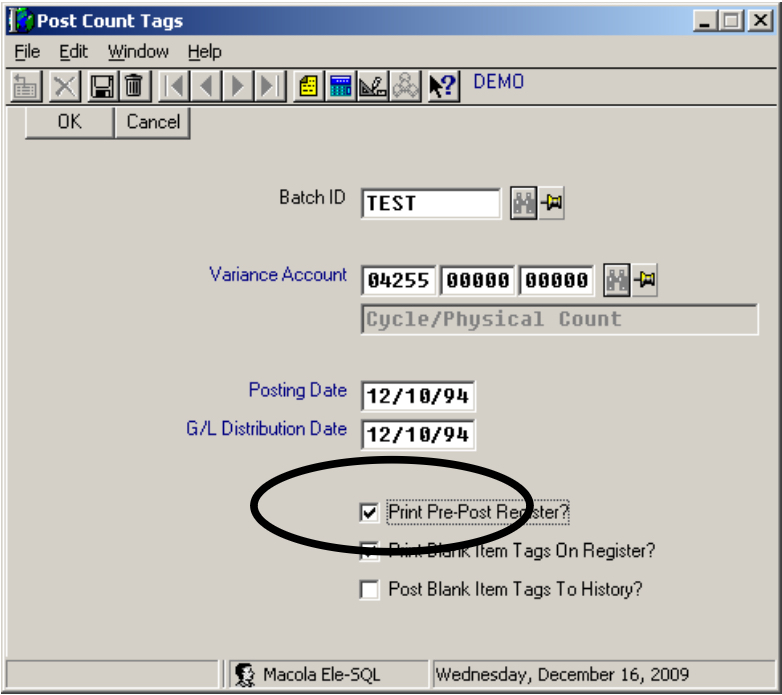
- You will NOT post your inventory tags UNTIL you print the pre-posting register. The pre-post register is very important because it allows you to check that you have keyed in the correct part number and quantities. Most importantly, it shows you the dollar amount of the adjustment that will be made. You MUST run this pre-post register before proceeding.
- The following fields must be keyed:
- Batch ID – use the same batch numbers as you created in step 4 above
- Variance Account – specify the proper variance account.
- Posting Date – this date MUST be the freeze date from step 4 above.
- General Ledger Distribution Date – this is the date to be used by the software to generate distributions in the I/M Distribution File.
- Print Pre-Post Register? – This box MUST be checked. DO NOT
RUN THIS PROGRAM UNLESS THIS BOX IS CHECKED, OR
YOU WILL POST YOUR TAGS. - Print Blank Item Tags on Register? – Do not check this box.
- Post Blank Item Tags to History? – Do not check this box.
12. Post the Inventory Tags
- Make a backup of all of your inventory files before posting tags.
- Ensure all users are out of all inventory processing programs before proceeding. If the posting program does not work correctly, it will probably be caused by a “file locking” problem.
- If you activated the “Use Frozen Quantities in Calculations?” check box in step 5 above, the program will base the adjustment on the frozen quantity. Uncounted items will have their on-hand quantity set to ZERO.
- If you did not activate the “Use Frozen Quantities…”, the on-hand quantity for all items and bins in the batch will be set to the counted quantity for those item that were counted.
- After posting, all frozen tag information in the item location and inventory bin files is set to zeros. The following data fields need to be keyed:
- Batch ID – use the same batch numbers as you created in step 5 above
- Variance Account – specify the proper variance account.
- Posting Date – this date MUST be the freeze date from step 5 above.
DO NOT PROCEED UNLESS YOU ARE CERTAIN THAT YOU
KNOW THE FREEZE DATE USED WHEN IN STEP 5 ABOVE.
(DO NOT USE TODAY’S DATE). - General Ledger Distribution Date – this is the date to be used by the software to generate distributions in the I/M Distribution File.
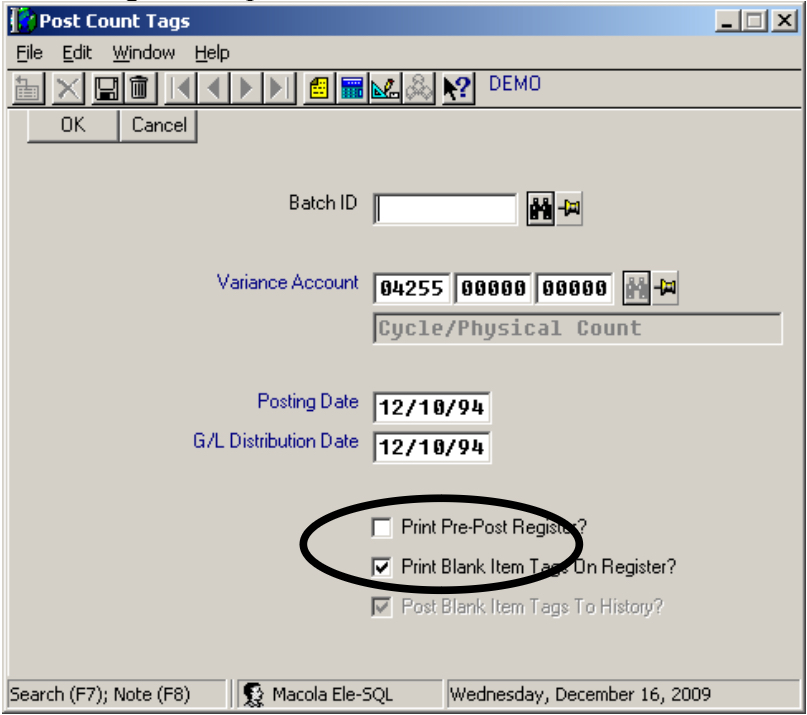
- Print Pre-Post Register? – ALWAYS PRINT THE PRE-POST REGISTER PRIOR TO YOUR FINAL POSTING. This allows you to see your total inventory dollar adjustment prior to posting. Always specify “file” when printing the register to prevent a loss of this report if your printer fails.
The pre-post register is very important because it allows you to check that you have keyed in the correct part number and quantities. Most importantly, it shows you the dollar amount of the adjustment that will be made.
- Print Blank Item Tags on Register? – Activate this box if you want the software to include blank item tags on the register.
- Post Blank Item Tags to History? – Activate this box if you want the software to post blank item tags to the Tag History File.
The following is a sample of this screen:
13. Print the Frozen stock status report again and compare the total to the total obtained in step 11 above. The variance between the two report totals should equal the total variance posted in step 12.
14. Spot-check the adjusted on-hand quantities
- Use the PULSE Inventory Status report to spot-check the resulting adjusted on-hand quantities.
15. Errors that may occur (most of which cannot be resolved until you post your tags)
- During counting, you find parts not in the Macola® master file or not in the correct warehouse location.
- When keying a count, you find that no tag number was assigned to it. This is caused by the item not being set up correctly in your Macola® item master file (ex., it was set to ‘not controlled’).
- You forget to post the tags.
- You did not generate enough extra tags.
- You run the PULSE Inventory Exceptions report and find that some items were not counted.
16. PULSE Dashboard screens that will make counting and reconciliation easier
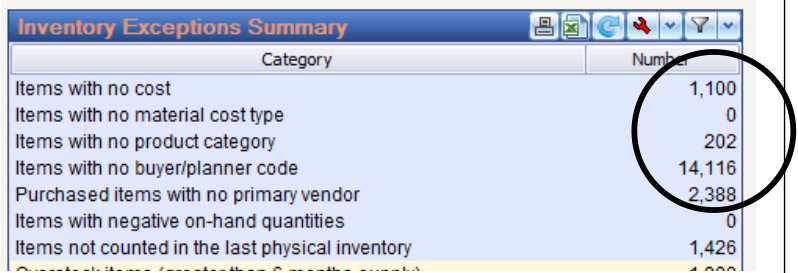
- Inventory Exceptions Summary – items with no cost, negative on-hand quantities, and items not counted in the last inventory.
- Physical Inventory Prior Variances – this report will allow you to pinpoint all items over the past X months (ex. 36 months) that have been counted with a variance greater than Y% (ex. 90%). The resulting list will pinpoint the top 20 or 30 problem items that need to be pre-counted, counted, and re- counted.

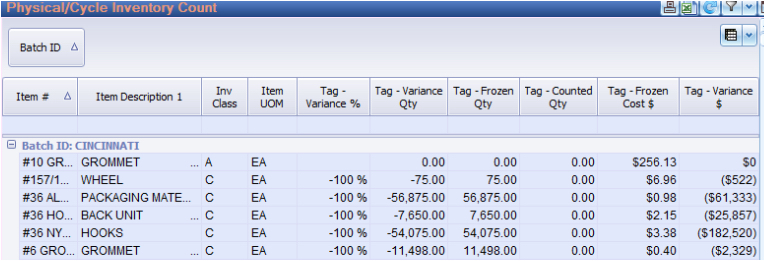
- Physical/Cycle Inventory Count – This report will allow you to view real- time variances during your counting or keying steps. If you are keying your counts at the same time you are counting, this will pinpoint obvious counting errors, and you can have them re-counted immediately.
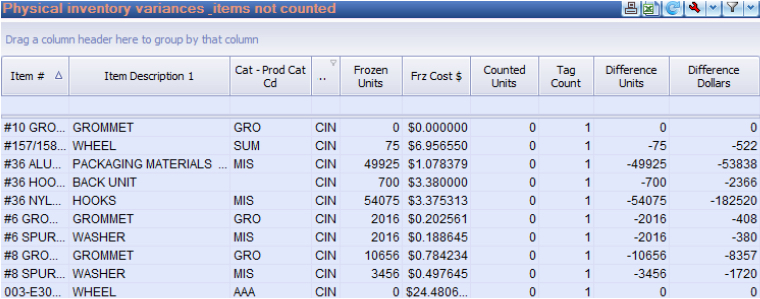
- Physical Inventory Variances & Items Not Counted – the standard Macola® processing does not provide a combined report of variances and items not counted before posting your batch of tags. This is very important because you will need to create a brand-new batch of tags if you forget to count some items.
Download the checklist here: Download the Physical Inventory Checklist for Progression.
